
I have made pattern for these mittens in both norwegian and english. Unfortunately, I doesn`t have a good program for designing patterns, but I hope that it will be understanding, even when it is drawn by hand... :)
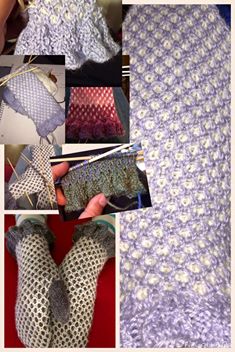
Honeycombmittens
Design: Henriette
Jenssen
Yarn:
Drops Baby Alpaca Silk
Gauge:
23x30
Needles:
#2,5 and 3
Size:
XS, S/M, M/L
You
will need 100 gr. 50 gr in each colour if you choose two.
Cast on 120, 120, 132 stitches on needle 2,5 (either doublepoint needles or magic loop)
Knit one round garter stitch. In the next round you
w2ill start doing the «frill edge». You will *purl 3, knit 9* Repeat from * to
* throughout the round, knit another round the same way. The next round you
will: *purl 3, knit 2 together in the back of the stitch, knit 5, knit 2
together* Repeat. Next round you will: *purl 3, knit 7* Repeat. Next round: *purl 3, knit 2 together in the
back of the stitch, knit 3, knit 2 together* Repeat. Next round: *purl 3, knit,
5* Repeat. Then * purl 3, knit 2 together in the back of the stitch, knit 1,
knit 2 together* Repeat. The last round
will be *purl 3, knit 3* You will now have 60, 60, 66 stitches on the needles.
Now you change to needles #3, knit 3 rounds while
you adjust the number of stitches to 60, 68, 76. Make sure you have an even
number of stitches on each needle that will make the pattern go much easier).
Please put an markingthread in each side, where the round starts and another
one after 30, 34, 38 stitches, it will be helpfull when placing the thumbhole
and in the finishing decreasing.
You are now ready to start the «honeycombpattern»


Knit this pattern until it measures 7, 9, 11 cm from
the frill edge, now you will have to make holes for the thumb, knit 2 stitches
in from the side, put 6, 6, 7 stitches on a thread, cast on new 6, 6, 7
stitches on the needle again and continue. When your work measures 19, 20, 21
cm from the frill edge you will start decreasing, we decrease in both sides, on
each side of the marking thread, each round.
After the markingthread: knit 1, knit 2 together in
the back of the stitches.
Before the markingthread, knit until 3 stitches are
left, then knit 2 together, knit 1.
When you have 10-12 stitches left on the needles you
can cut the knittingthreads, pull it through the stitches left, tighten and
fasten well.
Thumb: put the 6, 6, 7 stitches from the thread on
to a needle, pick up 12, 12, 14 stitches around the hole to a total of 18, 18, 20 stitches, withe same colour that
you used for the frill edge. Knit aprox. 20, 22, 24 rounds, then knit 2 rounds
where you knit 2 and 2 together for 2 rounds, then cut the thread, pull it
through the stitches left on the needles and fasten well.
Takk for mønster!! now it doesn't seems so difficult :D
SvarSlett